The "Sicilian Meatballs" Definition
is said "Meatballs": a large cylindrical piece of minced meat, seasoned and cooked as dumplings, to be cut then sliced \u200b\u200b(definition from the dictionary "Zingarelli).
Now, I teach you to do it in 10 moves, ie, in 10 pictures!
Ingredients for two "meatballs"
- g minced meat: 1,000
- Breadcrumbs: 250 g
- Parmesan or Grana Padano cheese: 100 g
- Fresh Eggs No.: 4-5
- No. 2 cans of peeled tomatoes 800 g
- A teaspoon of salt

Filling (Photo No. 1):
- Bacon: Provolone Middle
- g 200 g 250
- hard-boiled eggs : No. 4
procedure
Take a bowl big enough to hold all the ingredients and add in order: the ground meat, bread crumbs, Parmesan cheese, a teaspoon of salt and start
Mix the ground, dry, knead with your hands. At the end add the eggs, four big if, if five small (Photo n ° 2).

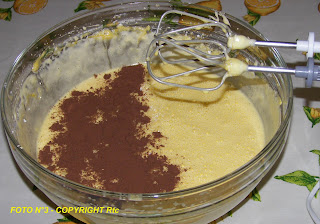
Mix all ingredients well, until a homogeneous mass. Make a cut in the middle of the dough, you can calculate the amount needed to prepare a "Meatloaf" (Picture No. 3).

Spread half of the dough on a cutting board and put plastic over half of the filling (Photo No. 4).
Lift the edges of the blade with a large knife and start closing the meatloaf
(Photo No. 5).
E 'well, at this point, wet hands with water in a bowl placed near where you work. Wetting, thus, the outside of the meatloaf encourages the adhesive action of the bread crumbs. Eventually, you get an external weight so elastic as to allow the posting of the meatloaf platter (Photo No. 6).

take at this point, a large pan, lined with Teflon (non stick), get plenty of vegetable oil and bring to boiling point (in fact, there is the oil bubbles, but the ' water it contains). Gently put a loaf at a time, trying not to dip your fingers, otherwise they are pain (Photo No. 7)!

Making brown the meat loaf by turning on itself by means of two ladles. When it is golden brown, remove from the pan resting on a large platter. After the second loaf browned, remove the frying oil. Take a large pot with a diameter greater than the length Meatloaf, and put in the ingredients for cooking a little extra virgin olive oil, a bit of onion, making it brown well. Open the two cans of tomatoes with a masher, get a good tomato sauce with fried onions adding Doc. Dip meatballs in the pot and the two start their cooking at low heat (Photo No. 8). If you prefer to spice up the sauce, add: pepper, nutmeg, cloves, or more, to taste. E 'should be added during cooking No. 2 teaspoons of sugar to remove the bitterness of the tomato.
 After an hour of cooking, turn off the gas and let cool. With two spoons, used before, Extract the meat loaf from pan, place in a serving dish (Photo No. 9) and after cooling, put them in the refrigerator. The sauce can be put in a smaller pot for its subsequent use.

After a few hours, the meatballs are ready to be cut. (Photo No. 10).
 Serving as meatloaf and eat it? Cold, accompanied by an appropriate boundary. Hot, by dripping it over the slices of the sauce, properly heated. The sauce may very well be also used to flavor: fettuccine, spaghetti, macaroni or other pasta, to serve as a first course. If you followed the instructions carefully, that's it.
Bon appetit!


 As 2009 is the year of "blacks" because Obama did not dedicate this cake? The cake is entirely black. Including the figurine.
  After removing the leaves, the core and the bark, wash the broccoli in water several times, so to eliminate any impurities present in them. The large flowers that you see in the picture, should be kept in small tufts, peeled and cut them properly.
 Continue with another layer of broccoli and another layer of sauce, finishing with a layer of broccoli. Generally, there are three layers of broccoli separated by two of seasoning.

 When one realizes that the pot does not go down more, remove the pot and add a 'copious amounts of olive oil and a glass of white wine. Continue cooking pot closed, penetrating with a fork, periodically, the hardest parts of broccoli. When a fork penetrates well in most parts of the mass, the cooking is completed. In the event that there is still too much presence of liquid, apart from the oil, let it evaporate in open pot (Picture No. 7).
  cooked, tilting the pan, the liquid, composed, for the most part, oil added should be barely visible. When cooking, make some small samples to assess the degree of flavor of broccoli, adding, if necessary, salt. Allow to cool and then put the pot in the refrigerator for more compact mass, before turning out. After a couple of hours, remove the pan from the refrigerator, place on a serving plate upside down, turn both 180 and "voila" mold release occurred (Photo No. 8).

